Showing posts with label Blogger. Show all posts

Stylish Animated Blogger Recent Posts Widget

Friday, 24 August 2012
n this post will help you to create a recent

post widget for your blogger. Its animated

widget with thumbnail and Include with nice

back ground. So you can try to add it to your

blog.


Stylish Animated Blogger Recent Posts Widget


1. Log in to blogger  Design > Page Element.


2. Click Add Gadget and select 'HTML/Javascript


3.Now Paste Below code.


<script src="http://ajax.googleapis.com/ajax/libs/jquery/1.3.2/jquery.min.js" type="text/javascript"></script>     
<style type="text/css" media="screen">
<!--
#spylist {
overflow:hidden;
margin-top:5px;
padding:0px 0px;
height:350px;
}
.spydate{
overflow:hidden;
font-size:10px; }

#spylist ul{
width:350px;
overflow:hidden;
list-style-type: none;
padding: 0px 0px;
margin:0px 0px;
}
#spylist li {
width:230px;
background: #1ed2f2;
list-style-type: none;
margin:0 0 5px 0px;
padding:5px 5px 1px 10px !important;
-webkit-transition:all 0.2s ease;-moz-transition:all 0.2s ease;-o-transition:all 0.2s ease;border: 0 none !important;-webkit-border-top-left-radius:40px;-webkit-border-bottom-right-radius:40px;-moz-border-radius-topleft:40px;-moz-border-radius-bottomright:40px;border-top-left-radius:40px;border-bottom-right-radius:40px;
}

#spylist li:hover {
background: #84f6f5;

}

#spylist li a {
text-decoration:none;
color:#4B545B;
font-size:11px;
height:18px;
overflow:hidden;
margin:0px 0px;
padding:0px 0px 2px 0px;
}

#spylist li img {
float:left;
margin-right:5px;
margin-top:3px;
background:none;
border:0;
}

.spycomment{
overflow:hidden;
font-family:Tahoma,Arial,verdana, sans-serif;
font-size:10px;
color:#262B2F;
padding:0px 0px;
margin:0px 0px;
}
-->
</style>
<script language='JavaScript'>


imgr = new Array();

imgr[0] = "http://i43.tinypic.com/orpg0m.jpg";

imgr[1] = "http://i43.tinypic.com/orpg0m.jpg";

imgr[2] = "http://i43.tinypic.com/orpg0m.jpg";

imgr[3] = "http://i43.tinypic.com/orpg0m.jpg";

imgr[4] = "http://i43.tinypic.com/orpg0m.jpg";
showRandomImg = true;

boxwidth = 255;

cellspacing = 6;

borderColor = "#232c35";

bgTD = "#000000";

thumbwidth = 70;

thumbheight = 70;

fntsize = 12;

acolor = "#666";

aBold = true;

icon = " ";

text = "comments";

showPostDate = false;

summaryPost = 40;

summaryFontsize = 10;

summaryColor = "#666";

icon2 = " ";

numposts = 10;

home_page = "http://smsdudez.blogspot.com/";

limitspy=4
intervalspy=4000

</script>

<div id="spylist">
<script src='http://dl.getdropbox.com/u/708209/scriptabufarhan/recentspy/recentpostthumbspy-min.js' type='text/javascript'></script>
</div><a style=" float:right;font-size:8px; color:#3B78CD; text-decoration:none;" href="http://www.smsdudez.blogspot.com/search/label/blogger%20widgets">Blogger widget</a>


After paste above code

* Replace http://smsdudez.blogspot.com/ with your Site URL


4. Now save your HTML/Javascript
Read more ...

Stylish Animated Blogger Recent Posts Widget

Friday, 24 August 2012
n this post will help you to create a recent

post widget for your blogger. Its animated

widget with thumbnail and Include with nice

back ground. So you can try to add it to your

blog.


Stylish Animated Blogger Recent Posts Widget


1. Log in to blogger  Design > Page Element.


2. Click Add Gadget and select 'HTML/Javascript


3.Now Paste Below code.


<script src="http://ajax.googleapis.com/ajax/libs/jquery/1.3.2/jquery.min.js" type="text/javascript"></script>     
<style type="text/css" media="screen">
<!--
#spylist {
overflow:hidden;
margin-top:5px;
padding:0px 0px;
height:350px;
}
.spydate{
overflow:hidden;
font-size:10px; }

#spylist ul{
width:350px;
overflow:hidden;
list-style-type: none;
padding: 0px 0px;
margin:0px 0px;
}
#spylist li {
width:230px;
background: #1ed2f2;
list-style-type: none;
margin:0 0 5px 0px;
padding:5px 5px 1px 10px !important;
-webkit-transition:all 0.2s ease;-moz-transition:all 0.2s ease;-o-transition:all 0.2s ease;border: 0 none !important;-webkit-border-top-left-radius:40px;-webkit-border-bottom-right-radius:40px;-moz-border-radius-topleft:40px;-moz-border-radius-bottomright:40px;border-top-left-radius:40px;border-bottom-right-radius:40px;
}

#spylist li:hover {
background: #84f6f5;

}

#spylist li a {
text-decoration:none;
color:#4B545B;
font-size:11px;
height:18px;
overflow:hidden;
margin:0px 0px;
padding:0px 0px 2px 0px;
}

#spylist li img {
float:left;
margin-right:5px;
margin-top:3px;
background:none;
border:0;
}

.spycomment{
overflow:hidden;
font-family:Tahoma,Arial,verdana, sans-serif;
font-size:10px;
color:#262B2F;
padding:0px 0px;
margin:0px 0px;
}
-->
</style>
<script language='JavaScript'>


imgr = new Array();

imgr[0] = "http://i43.tinypic.com/orpg0m.jpg";

imgr[1] = "http://i43.tinypic.com/orpg0m.jpg";

imgr[2] = "http://i43.tinypic.com/orpg0m.jpg";

imgr[3] = "http://i43.tinypic.com/orpg0m.jpg";

imgr[4] = "http://i43.tinypic.com/orpg0m.jpg";
showRandomImg = true;

boxwidth = 255;

cellspacing = 6;

borderColor = "#232c35";

bgTD = "#000000";

thumbwidth = 70;

thumbheight = 70;

fntsize = 12;

acolor = "#666";

aBold = true;

icon = " ";

text = "comments";

showPostDate = false;

summaryPost = 40;

summaryFontsize = 10;

summaryColor = "#666";

icon2 = " ";

numposts = 10;

home_page = "http://smsdudez.blogspot.com/";

limitspy=4
intervalspy=4000

</script>

<div id="spylist">
<script src='http://dl.getdropbox.com/u/708209/scriptabufarhan/recentspy/recentpostthumbspy-min.js' type='text/javascript'></script>
</div><a style=" float:right;font-size:8px; color:#3B78CD; text-decoration:none;" href="http://www.smsdudez.blogspot.com/search/label/blogger%20widgets">Blogger widget</a>


After paste above code

* Replace http://smsdudez.blogspot.com/ with your Site URL


4. Now save your HTML/Javascript
Read more ...

New UI on Your Blogger Dashboard

Wednesday, 8 August 2012
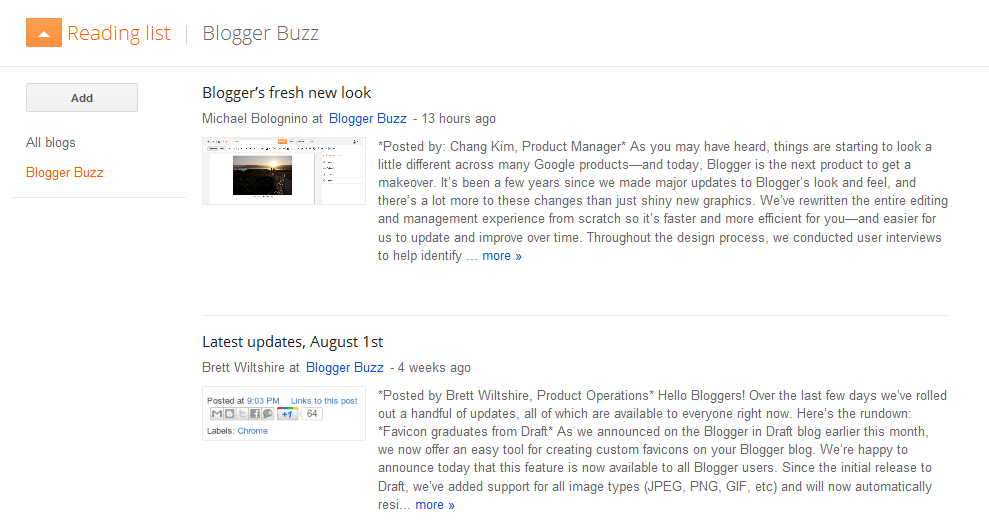
New UI on Your DashboardThe Blogger’s new UI has now migrated from Blogger Daft to the regular Dashboard.If you are a regular reader here, then you must have already seen screenshot of the new UI. Blogger has now made some improvements to  the new UI, and has plugged it into the regular dashboard.The new UI also includes an option to Edit your Template Code.

When you login to your Blogger Dashboard, you should see a notification asking you to check out the New UI.
image

If you dismissed this notification, don’t worry, you can still switch to the new UI.In your Old Dashboard, you will see a link asking you to try the new UI.
image
If you are not able to figure that out, just follow this link and you will be taken to the new UI.
Here are a few Screen Shots: (Click the image for a larger version)
Blogger Dashboard
Blogger Reading List
Blog Overview
Blog Posts
Blog Pages
Blog Comments
Blog Stats
Blog Earnings
Blog Layout
Blog Template
Edit Template HTML
Blog Settings
If you don’t like the new Interface, you can switch back to the old one.
image
Read more ...

New UI on Your Blogger Dashboard

Wednesday, 8 August 2012
New UI on Your DashboardThe Blogger’s new UI has now migrated from Blogger Daft to the regular Dashboard.If you are a regular reader here, then you must have already seen screenshot of the new UI. Blogger has now made some improvements to  the new UI, and has plugged it into the regular dashboard.The new UI also includes an option to Edit your Template Code.

When you login to your Blogger Dashboard, you should see a notification asking you to check out the New UI.
image

If you dismissed this notification, don’t worry, you can still switch to the new UI.In your Old Dashboard, you will see a link asking you to try the new UI.
image
If you are not able to figure that out, just follow this link and you will be taken to the new UI.
Here are a few Screen Shots: (Click the image for a larger version)
Blogger Dashboard
Blogger Reading List
Blog Overview
Blog Posts
Blog Pages
Blog Comments
Blog Stats
Blog Earnings
Blog Layout
Blog Template
Edit Template HTML
Blog Settings
If you don’t like the new Interface, you can switch back to the old one.
image
Read more ...

The Benefits of Hello Bar - Add this to Blogger

Tuesday, 7 August 2012

RaiShahnawaz Again With Great Post. There are so many sticky bars that are all over the internet far also RaiShahnawaz have some amazing sticky bars widgets now and I see many people welcomed it at my others blog so I came today with another good site that provide a service to create an easy customized sticky bar with a lot of advantages and this bar is also used on most of the popular blog . You can see statistics for it and even add your twitter and RSS FEEDS. So now before we continue you may like to see live demo.


What is the benefit of this bar Shown Above:

Before I show some of the benefits I will show some of the widgets that is created by RaiShahnawaz.Com :

1- Installation is so easy

2- You can updates your sticky bar directly from hello bar dashboard.

3- You can easily customize it .

4- The best thing that it can be return again after you close it.

5- There are so many styles that you can add to it like gradient and many other things that you will like.

6- You can view demo of it  on your site before you register on hello bar.

7- you will get many of the clicks to the link you view in it.

There are also a many others dynamic feathers that I did not mention and some that is available for you after upgrade that I really suggest you to do, you have to upgrade your account but after you use it and like it and see how much is it and how can you benefit from it a lot.

How To Install It???


you can simply go to the site by clicking here Hello Bar
you can view yours site on it by clicking on "Try It Out".
Click on free sign up.
Enter your email adress.
Go to your inbox and use the information they gave to you to login
Change your password after you login so that you can remember it after.
you will be able to customize your first bar directly which will be named as my hello bar.
Click on settings.
Change it as you want.
click on save's.
copy the code
paste it just before..

</head>
And now Congratulations you have Sucessfully created your hello bar.

Thats it!


Read more ...

The Benefits of Hello Bar - Add this to Blogger

Tuesday, 7 August 2012

RaiShahnawaz Again With Great Post. There are so many sticky bars that are all over the internet far also RaiShahnawaz have some amazing sticky bars widgets now and I see many people welcomed it at my others blog so I came today with another good site that provide a service to create an easy customized sticky bar with a lot of advantages and this bar is also used on most of the popular blog . You can see statistics for it and even add your twitter and RSS FEEDS. So now before we continue you may like to see live demo.


What is the benefit of this bar Shown Above:

Before I show some of the benefits I will show some of the widgets that is created by RaiShahnawaz.Com :

1- Installation is so easy

2- You can updates your sticky bar directly from hello bar dashboard.

3- You can easily customize it .

4- The best thing that it can be return again after you close it.

5- There are so many styles that you can add to it like gradient and many other things that you will like.

6- You can view demo of it  on your site before you register on hello bar.

7- you will get many of the clicks to the link you view in it.

There are also a many others dynamic feathers that I did not mention and some that is available for you after upgrade that I really suggest you to do, you have to upgrade your account but after you use it and like it and see how much is it and how can you benefit from it a lot.

How To Install It???


you can simply go to the site by clicking here Hello Bar
you can view yours site on it by clicking on "Try It Out".
Click on free sign up.
Enter your email adress.
Go to your inbox and use the information they gave to you to login
Change your password after you login so that you can remember it after.
you will be able to customize your first bar directly which will be named as my hello bar.
Click on settings.
Change it as you want.
click on save's.
copy the code
paste it just before..

</head>
And now Congratulations you have Sucessfully created your hello bar.

Thats it!


Read more ...

Add Multi Colored Popular Post Widget In Blogger

Monday, 6 August 2012
We usually show Popular post widget to our readers so that they can enjoy the most popular post of our blog. But this article is not for Normal popular post widget rather how you can add multi colored popular post widget in Blogger. The multi colored popular post widget looks really awesome. It has also three displaying modes: display title only, display title with image thumbnail. I hope you will enjoy the widget.


  • Go To Blogger Dashboard → Design → Edit HTML
  • Now Find the following code using CTRL+F


/* Variable definitions
====================


  • Copy and Paste the Code the code shown below just after it


  • <Group description="PopularPosts Backgrounds" selector="#PopularPosts1">
    <Variable name="PopularPosts.background.color1" description="background color1" type="color" default="#fa4242" value="#ff4c54"/>
    <Variable name="PopularPosts.background.color2" description="background color2" type="color" default="#ee6107" value="#ff764c"/>
    <Variable name="PopularPosts.background.color3" description="background color3" type="color" default="#f0f" value="#ffde4c"/>
    <Variable name="PopularPosts.background.color4" description="background color4" type="color" default="#ff0" value="#c7f25f"/>
    <Variable name="PopularPosts.background.color5" description="background color5" type="color" default="#0ff" value="#33c9f7"/>
    <Variable name="PopularPosts.background.color6" description="background color6" type="color" default="#ff0" value="#7ee3c7"/>
    <Variable name="PopularPosts.background.color7" description="background color7" type="color" default="#ff0" value="#f6993d"/>
    </Group>


  • Now Find the code shown below using [ctrl+F]


  • ]]></b:skin>


  • Now Paste the Code shown below just before or above it


  • #PopularPosts1 ul{margin:0;padding:5px 0;list-style-type:none}
    #PopularPosts1 ul li{position:relative;margin:5px 0;border:0;padding:10px}
    #PopularPosts1 ul li:first-child{background:$(PopularPosts.background.color1);width:90%}
    #PopularPosts1 ul li:first-child:after{content:"1"}
    #PopularPosts1 ul li:first-child + li{background:$(PopularPosts.background.color2);width:85%}
    #PopularPosts1 ul li:first-child + li:after{content:"2"}
    #PopularPosts1 ul li:first-child + li + li{background:$(PopularPosts.background.color3);width:80%}
    #PopularPosts1 ul li:first-child + li + li:after{content:"3"}
    #PopularPosts1 ul li:first-child + li + li + li{background:$(PopularPosts.background.color4);width:75%}
    #PopularPosts1 ul li:first-child + li + li + li:after{content:"4"}
    #PopularPosts1 ul li:first-child + li + li + li + li{background:$(PopularPosts.background.color5);width:70%}
    #PopularPosts1 ul li:first-child + li + li + li + li:after{content:"5"}
    #PopularPosts1 ul li:first-child + li + li + li + li +li{background:$(PopularPosts.background.color6);width:65%}
    #PopularPosts1 ul li:first-child + li + li + li + li + li:after{content:"6"}
    #PopularPosts1 ul li:first-child + li + li + li + li + li +li{background:$(PopularPosts.background.color7);width:60%}
    #PopularPosts1 ul li:first-child + li + li + li + li + li + li:after{content:"7"}
    #PopularPosts1 ul li:first-child:after,
    #PopularPosts1 ul li:first-child + li:after,
    #PopularPosts1 ul li:first-child + li + li:after,
    #PopularPosts1 ul li:first-child + li + li + li:after,
    #PopularPosts1 ul li:first-child + li + li + li + li:after,
    #PopularPosts1 ul li:first-child + li + li + li + li + li:after,
    #PopularPosts1 ul li:first-child + li + li + li + li + li + li:after{position:absolute;top:20px;right:-15px;border-radius:50%;background:#353535;width:30px;height:30px;line-height:1em;text-align:center;font-size:28px;color:#fff}
    #PopularPosts1 ul li .item-thumbnail{float:left;border:0;margin-right:10px;background:transparent;padding:0;width:40px;height:40px}
    #PopularPosts1 ul li a{font-size:12px;color:#444;text-decoration:none}
    #PopularPosts1 ul li a:hover{color:#222;text-decoration:none}


  • Now Find the code shown below using F3


  • <b:section class='sidebar' id='sidebar' preferred='yes'>


  • Now Paste the Code Shown Below just below/after it


  • <b:widget id='PopularPosts1' locked='false' title='Popular Posts' type='PopularPosts'>
    <b:includable id='main'>
    <b:if cond='data:title'>
    <h2><data:title/></h2>
    </b:if>
    <div class='widget-content popular-posts'>
    <ul>
    <b:loop values='data:posts' var='post'>
    <li>
    <b:if cond='data:showThumbnails == &quot;false&quot;'>
    <b:if cond='data:showSnippets == &quot;false&quot;'>
    <a expr:href='data:post.href' expr:title='data:post.title' rel='bookmark'><data:post.title/></a>
    <b:else/>
    <a expr:href='data:post.href' expr:title='data:post.snippet' rel='bookmark'><data:post.title/></a>
    </b:if>
    <b:else/>
    <b:if cond='data:showSnippets == &quot;false&quot;'>
    <b:if cond='data:post.thumbnail'>
    <img class='item-thumbnail' expr:alt='data:post.title' expr:src='data:post.thumbnail'/>
    <b:else/>
    <img alt='no image' class='item-thumbnail' src='https://blogger.googleusercontent.com/img/b/R29vZ2xl/AVvXsEi6wGxuZEUhuvouGXUMAX7eHBjx9OaP4rJDcblpenR4JC64c7GCcEl1mvzHeKVSj5OuBwyPhP1NIAPvtN7CAi0HZuSk_FqGDDA9gcgXcP2Yx-cqSPSnSrCmVzwmA_rjzgz9CVW6rqdCyow/s1600/defaultimage.jpg'/>
    </b:if>
    <a expr:href='data:post.href' expr:title='data:post.title' rel='bookmark'><data:post.title/></a>
    <div class='clear'/>
    <b:else/>
    <b:if cond='data:post.thumbnail'>
    <img class='item-thumbnail' expr:alt='data:post.title' expr:src='data:post.thumbnail'/>
    <b:else/>
    <img alt='no image' class='item-thumbnail' src='https://blogger.googleusercontent.com/img/b/R29vZ2xl/AVvXsEi6wGxuZEUhuvouGXUMAX7eHBjx9OaP4rJDcblpenR4JC64c7GCcEl1mvzHeKVSj5OuBwyPhP1NIAPvtN7CAi0HZuSk_FqGDDA9gcgXcP2Yx-cqSPSnSrCmVzwmA_rjzgz9CVW6rqdCyow/s1600/defaultimage.jpg'/>
    </b:if>
    <a expr:href='data:post.href' expr:title='data:post.snippet' rel='bookmark'><data:post.title/></a>
    <div class='clear'/>
    </b:if>
    </b:if>
    </li>
    </b:loop>
    </ul>
    </div>
    </b:includable>
    </b:widget>


    Now save the template and done.

    Settings


    • Now got o Page Element You will find out a popular widget
    • Click on the edit link of Popular Posts widget
    • Select “Display Up To 7 Posts”
    • Now Save the widget


    Change Color


    Go To Design → Template Designer → Advanced → PopularPostsBackground


    Please comment here if you face any problem. Take only 10 seconds to share the article if you like.

    Read more ...

    Add Multi Colored Popular Post Widget In Blogger

    Monday, 6 August 2012
    We usually show Popular post widget to our readers so that they can enjoy the most popular post of our blog. But this article is not for Normal popular post widget rather how you can add multi colored popular post widget in Blogger. The multi colored popular post widget looks really awesome. It has also three displaying modes: display title only, display title with image thumbnail. I hope you will enjoy the widget.


    • Go To Blogger Dashboard → Design → Edit HTML
    • Now Find the following code using CTRL+F


    /* Variable definitions
    ====================


  • Copy and Paste the Code the code shown below just after it


  • <Group description="PopularPosts Backgrounds" selector="#PopularPosts1">
    <Variable name="PopularPosts.background.color1" description="background color1" type="color" default="#fa4242" value="#ff4c54"/>
    <Variable name="PopularPosts.background.color2" description="background color2" type="color" default="#ee6107" value="#ff764c"/>
    <Variable name="PopularPosts.background.color3" description="background color3" type="color" default="#f0f" value="#ffde4c"/>
    <Variable name="PopularPosts.background.color4" description="background color4" type="color" default="#ff0" value="#c7f25f"/>
    <Variable name="PopularPosts.background.color5" description="background color5" type="color" default="#0ff" value="#33c9f7"/>
    <Variable name="PopularPosts.background.color6" description="background color6" type="color" default="#ff0" value="#7ee3c7"/>
    <Variable name="PopularPosts.background.color7" description="background color7" type="color" default="#ff0" value="#f6993d"/>
    </Group>


  • Now Find the code shown below using [ctrl+F]


  • ]]></b:skin>


  • Now Paste the Code shown below just before or above it


  • #PopularPosts1 ul{margin:0;padding:5px 0;list-style-type:none}
    #PopularPosts1 ul li{position:relative;margin:5px 0;border:0;padding:10px}
    #PopularPosts1 ul li:first-child{background:$(PopularPosts.background.color1);width:90%}
    #PopularPosts1 ul li:first-child:after{content:"1"}
    #PopularPosts1 ul li:first-child + li{background:$(PopularPosts.background.color2);width:85%}
    #PopularPosts1 ul li:first-child + li:after{content:"2"}
    #PopularPosts1 ul li:first-child + li + li{background:$(PopularPosts.background.color3);width:80%}
    #PopularPosts1 ul li:first-child + li + li:after{content:"3"}
    #PopularPosts1 ul li:first-child + li + li + li{background:$(PopularPosts.background.color4);width:75%}
    #PopularPosts1 ul li:first-child + li + li + li:after{content:"4"}
    #PopularPosts1 ul li:first-child + li + li + li + li{background:$(PopularPosts.background.color5);width:70%}
    #PopularPosts1 ul li:first-child + li + li + li + li:after{content:"5"}
    #PopularPosts1 ul li:first-child + li + li + li + li +li{background:$(PopularPosts.background.color6);width:65%}
    #PopularPosts1 ul li:first-child + li + li + li + li + li:after{content:"6"}
    #PopularPosts1 ul li:first-child + li + li + li + li + li +li{background:$(PopularPosts.background.color7);width:60%}
    #PopularPosts1 ul li:first-child + li + li + li + li + li + li:after{content:"7"}
    #PopularPosts1 ul li:first-child:after,
    #PopularPosts1 ul li:first-child + li:after,
    #PopularPosts1 ul li:first-child + li + li:after,
    #PopularPosts1 ul li:first-child + li + li + li:after,
    #PopularPosts1 ul li:first-child + li + li + li + li:after,
    #PopularPosts1 ul li:first-child + li + li + li + li + li:after,
    #PopularPosts1 ul li:first-child + li + li + li + li + li + li:after{position:absolute;top:20px;right:-15px;border-radius:50%;background:#353535;width:30px;height:30px;line-height:1em;text-align:center;font-size:28px;color:#fff}
    #PopularPosts1 ul li .item-thumbnail{float:left;border:0;margin-right:10px;background:transparent;padding:0;width:40px;height:40px}
    #PopularPosts1 ul li a{font-size:12px;color:#444;text-decoration:none}
    #PopularPosts1 ul li a:hover{color:#222;text-decoration:none}


  • Now Find the code shown below using F3


  • <b:section class='sidebar' id='sidebar' preferred='yes'>


  • Now Paste the Code Shown Below just below/after it


  • <b:widget id='PopularPosts1' locked='false' title='Popular Posts' type='PopularPosts'>
    <b:includable id='main'>
    <b:if cond='data:title'>
    <h2><data:title/></h2>
    </b:if>
    <div class='widget-content popular-posts'>
    <ul>
    <b:loop values='data:posts' var='post'>
    <li>
    <b:if cond='data:showThumbnails == &quot;false&quot;'>
    <b:if cond='data:showSnippets == &quot;false&quot;'>
    <a expr:href='data:post.href' expr:title='data:post.title' rel='bookmark'><data:post.title/></a>
    <b:else/>
    <a expr:href='data:post.href' expr:title='data:post.snippet' rel='bookmark'><data:post.title/></a>
    </b:if>
    <b:else/>
    <b:if cond='data:showSnippets == &quot;false&quot;'>
    <b:if cond='data:post.thumbnail'>
    <img class='item-thumbnail' expr:alt='data:post.title' expr:src='data:post.thumbnail'/>
    <b:else/>
    <img alt='no image' class='item-thumbnail' src='https://blogger.googleusercontent.com/img/b/R29vZ2xl/AVvXsEi6wGxuZEUhuvouGXUMAX7eHBjx9OaP4rJDcblpenR4JC64c7GCcEl1mvzHeKVSj5OuBwyPhP1NIAPvtN7CAi0HZuSk_FqGDDA9gcgXcP2Yx-cqSPSnSrCmVzwmA_rjzgz9CVW6rqdCyow/s1600/defaultimage.jpg'/>
    </b:if>
    <a expr:href='data:post.href' expr:title='data:post.title' rel='bookmark'><data:post.title/></a>
    <div class='clear'/>
    <b:else/>
    <b:if cond='data:post.thumbnail'>
    <img class='item-thumbnail' expr:alt='data:post.title' expr:src='data:post.thumbnail'/>
    <b:else/>
    <img alt='no image' class='item-thumbnail' src='https://blogger.googleusercontent.com/img/b/R29vZ2xl/AVvXsEi6wGxuZEUhuvouGXUMAX7eHBjx9OaP4rJDcblpenR4JC64c7GCcEl1mvzHeKVSj5OuBwyPhP1NIAPvtN7CAi0HZuSk_FqGDDA9gcgXcP2Yx-cqSPSnSrCmVzwmA_rjzgz9CVW6rqdCyow/s1600/defaultimage.jpg'/>
    </b:if>
    <a expr:href='data:post.href' expr:title='data:post.snippet' rel='bookmark'><data:post.title/></a>
    <div class='clear'/>
    </b:if>
    </b:if>
    </li>
    </b:loop>
    </ul>
    </div>
    </b:includable>
    </b:widget>


    Now save the template and done.

    Settings


    • Now got o Page Element You will find out a popular widget
    • Click on the edit link of Popular Posts widget
    • Select “Display Up To 7 Posts”
    • Now Save the widget


    Change Color


    Go To Design → Template Designer → Advanced → PopularPostsBackground


    Please comment here if you face any problem. Take only 10 seconds to share the article if you like.

    Read more ...

    How To Add Print And PDF Button For Blogger

    Monday, 6 August 2012
    Adding PDF or Print button to blogger is a cool stuff. Your readers can print your webpage or download the PDF of your articles. You may have some busy readers, They can easily download PDF file with one click when they have no time to read the articles surfing your site. They can collect the PDF files and read them offline. You should let your readers to enjoy the chance. You can add print and PDf button to blogger by printfriendly service.


    Go to Blogger → Design → Add A Widget → Add A HTML/Javascript Widget


    Now paste the Following code in the widget and done


    <script src="http://cdn.printfriendly.com/printfriendly.js" type="text/javascript"></script><script type="text/javascript">document.doAT = function(cl){var myclass = new RegExp("hentry");var myTitleContainer = new RegExp("post-title");var myPostContent = new RegExp("post-footer");var elem = this.getElementsByTagName("div");for (var i = 0; i < elem.length; i++){var classes = elem[i].className;if (myclass.test(classes)){var container = elem[i];for (var b = 0; b < container.childNodes.length; b++){var item = container.childNodes[b].className;if (myTitleContainer.test(item)){var link = container.childNodes[b].getElementsByTagName("a");if (typeof(link[0]) != "undefined"){var url = link[0].href;var index_page = true;}else{var url = document.url;var index_page = false;}if (typeof(url) == "undefined"|| url == "undefined" ){url = window.location.href;var index_page = false;}}if (myPostContent.test(item)){var footer = container.childNodes[b];}}var n = document.createElement("div");if (index_page == true) {var at = '<a href=' + url + '?pfstyle=wp' + ' style="float:left; margin-right: 1em; color:#6D9F00; text-decoration:none;" class="printfriendly" title="Printer Friendly and PDF"><img style="border:none;" src="http://cdn.printfriendly.com/pf-button.gif" alt="Print Friendly and PDF"/></a>';}else {var at = '<a href="http://www.printfriendly.com" style="float:left; margin-right: 1em; color:#6D9F00; text-decoration:none;" class="printfriendly" onclick="window.print(); return false;" title="Printer Friendly and PDF"><img style="border:none;" src="http://cdn.printfriendly.com/pf-button.gif" alt="Print Friendly and PDF"/></a>';}n.innerHTML = at;var origFooter = footer.innerHTML;footer.innerHTML = n.innerHTML + origFooter;footer.style.overflow = "hidden";}}return true;};document.doAT("hentry");</script>

    You can also change image link

    How To Add Print And PDF Button For Blogger 
    http://cdn.printfriendly.com/pf-button.gif

    How To Add Print And PDF Button For Blogger
    http://cdn.printfriendly.com/pf-button-both.gif

    How To Add Print And PDF Button For Blogger
    http://cdn.printfriendly.com/pf-button-big.gif

    How To Add Print And PDF Button For Blogger
    http://cdn.printfriendly.com/pf-icon.gif

    How To Add Print And PDF Button For Blogger
    http://cdn.printfriendly.com/button-print-grnw20.png

    How To Add Print And PDF Button For Blogger
    http://cdn.printfriendly.com/pf_button_sq_grn_l.png

    You will find a cute print or PDF button after every post

    How To Add Print And PDF Button For Blogger

    Take only 10 second to share the article with your friends if you like


    Read more ...

    10 Tips Very Useful to Write Your Most Popular Post Ever

    Monday, 6 August 2012
    People creating blog and they want that my blog can earn more revenue .So thats the thing is that the blog should have specific standard. so today i am goint to tell you about on One popular post can bring your more traffics and links than a month’s worth of your usual content.

    In this post, I want to set you a very challenge with the potential to launch your blog into the stratosphere.

    Make the next post you write your most popular post ever.


    The following ten tips form my key advice for the tackling this task. I used all of them when hitting the Digg front page for the first time. There’s no blueprint you can be follow to write an incredibly popular post, but you won’t have a chance unless you try. I’m confident these tips will be give you a good shot at success.


    1. Time is one of the more important than talent. Work on something for the eight hours and you can bet it will be good. You dont need to spend that long, however (though thats how long it took me to craft the first post I wrote that hit the Digg front page). More time means you can refine, format and fill your post with plenty of value. Take the time to really craft your content. It will show in  finished product.


    2. Use your best idea : A post will never be become wildly popular unless it fulfills a need, and does so emphatically. What’s something your niche wants but hasn’t got yet? Can you assemble a whole lot of really awesome (targeted) resources in one place? The more your posts helps people, the better it will do.


    3. Use formatting to yours advantage. These days, are the social media is key when it comes to launching your posts into the stratosphere. Social media users are notoriously spoiled for choice, however. Use formatting to emphasize the best aspects of your post. Hone in on your funniest lines, your most profound bits of advice, your best resources. Make them stand outs.


    4. Brainstorm headlines. There are the most probably one or two bloggers who’ve completely mastered the art of writing headlines for social media (you will know who they are). The rest of us haven’t been blessed with such skills. When you see a great headline, chances are it’s option #12 of a dozen choices. Few of us can think of a great headline straight away. Spend ten minutes brainstorming and you’re bound to stumble across something that works. A weak headline will the cripple your post’s chances of success. It’s essential that you put a lot of work into getting it right.


    5. Invest plenty of  thevalue in your post. Ever bookmarked or voted for something without completely reading it? We will all done it. It’s because of the ‘Wow’ factor — the presence of enough promised value in one place gets the reader enthusiastic about the post straight away. Instead of 5 tips, why not share 50? Instead of 9 resources, why not be 40 or more?


    7. Beauty is in the eye of the beholders. If yours post looks very good, it will draw readers in. Take the time to add images, thumbnails and formatting to what you create. Make yours post a visual feast. With so much web content presented in bland way, your post is guaranteed to stand out.


    8. Tell them what you are going to tell them. Readers will be skip your waffly introduction. You can say the same in less words, particularly when you’re writing for an impatient reader: someone who wants to get straight into your tips/resources/opinions. Use your introduction to the highlight why the reader should stick with your post. There’s a reason my post introductions mainly consist of: “In this post, I’m going to do this, this and that.” It’s what people really want to know: what am I getting in the exchange for my attention?


    9. Send messages with links. The best way to get the blogger to investigate your blog is by linking to them. We’ve got a natural desire to know what’s being said about us. If your post becomes really popular, each link inside it should send enough traffic outwards to be the worth investigating. Be generous with your outbound links when writing your most popular post. It gives other bloggers an incentive to link to you, because it’s ultimately more promotion for thems.


    10. Utilize your networks. If you want people to Digg, Stumble Reddit your post, theres no reason why you need to sit back with the fingers crossed and hope it happens. Ask them. Your loyal readers like you. You entertain them, or teach them, or help to them. If voting is a simple matter of clicking a link they’ll be more than happy to do so. Ask for votes in yours post and email readers and social media influencers. In most cases you will need to get the snowball rolling. After that, others will do most of the works for you.


    Happy Blogging ! i Hape You Like my Post ..
    Read more ...

    How To Add Print And PDF Button For Blogger

    Monday, 6 August 2012
    Adding PDF or Print button to blogger is a cool stuff. Your readers can print your webpage or download the PDF of your articles. You may have some busy readers, They can easily download PDF file with one click when they have no time to read the articles surfing your site. They can collect the PDF files and read them offline. You should let your readers to enjoy the chance. You can add print and PDf button to blogger by printfriendly service.


    Go to Blogger → Design → Add A Widget → Add A HTML/Javascript Widget


    Now paste the Following code in the widget and done


    <script src="http://cdn.printfriendly.com/printfriendly.js" type="text/javascript"></script><script type="text/javascript">document.doAT = function(cl){var myclass = new RegExp("hentry");var myTitleContainer = new RegExp("post-title");var myPostContent = new RegExp("post-footer");var elem = this.getElementsByTagName("div");for (var i = 0; i < elem.length; i++){var classes = elem[i].className;if (myclass.test(classes)){var container = elem[i];for (var b = 0; b < container.childNodes.length; b++){var item = container.childNodes[b].className;if (myTitleContainer.test(item)){var link = container.childNodes[b].getElementsByTagName("a");if (typeof(link[0]) != "undefined"){var url = link[0].href;var index_page = true;}else{var url = document.url;var index_page = false;}if (typeof(url) == "undefined"|| url == "undefined" ){url = window.location.href;var index_page = false;}}if (myPostContent.test(item)){var footer = container.childNodes[b];}}var n = document.createElement("div");if (index_page == true) {var at = '<a href=' + url + '?pfstyle=wp' + ' style="float:left; margin-right: 1em; color:#6D9F00; text-decoration:none;" class="printfriendly" title="Printer Friendly and PDF"><img style="border:none;" src="http://cdn.printfriendly.com/pf-button.gif" alt="Print Friendly and PDF"/></a>';}else {var at = '<a href="http://www.printfriendly.com" style="float:left; margin-right: 1em; color:#6D9F00; text-decoration:none;" class="printfriendly" onclick="window.print(); return false;" title="Printer Friendly and PDF"><img style="border:none;" src="http://cdn.printfriendly.com/pf-button.gif" alt="Print Friendly and PDF"/></a>';}n.innerHTML = at;var origFooter = footer.innerHTML;footer.innerHTML = n.innerHTML + origFooter;footer.style.overflow = "hidden";}}return true;};document.doAT("hentry");</script>

    You can also change image link

    How To Add Print And PDF Button For Blogger 
    http://cdn.printfriendly.com/pf-button.gif

    How To Add Print And PDF Button For Blogger
    http://cdn.printfriendly.com/pf-button-both.gif

    How To Add Print And PDF Button For Blogger
    http://cdn.printfriendly.com/pf-button-big.gif

    How To Add Print And PDF Button For Blogger
    http://cdn.printfriendly.com/pf-icon.gif

    How To Add Print And PDF Button For Blogger
    http://cdn.printfriendly.com/button-print-grnw20.png

    How To Add Print And PDF Button For Blogger
    http://cdn.printfriendly.com/pf_button_sq_grn_l.png

    You will find a cute print or PDF button after every post

    How To Add Print And PDF Button For Blogger

    Take only 10 second to share the article with your friends if you like


    Read more ...